

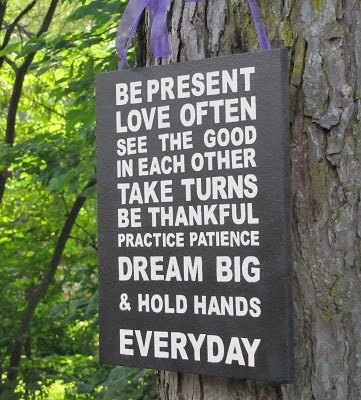
I had so much positive feedback on my subway sign that I thought I'd show you how I made it.
There is a company online called SubwaySigns.com that I used for inspiration. They have lots of actual vintage subway art signs and then sell reproductions on canvas also.
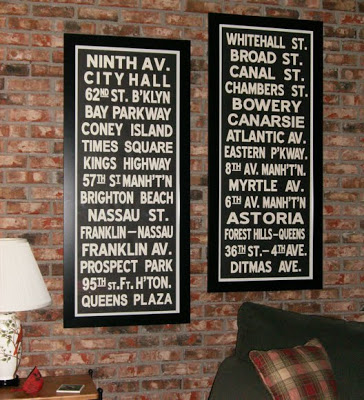 (Photo courtesy of SubwayArt.com)
These type of signs have been featured in the background of movies and were also sold at Pottery Barn a few years ago. There are many different ways to get the same effect, but this is how I made this one.

Step 1
I bought a piece of canvas artwork at Big Lots that was 12" wide by 36" long for $10.00. I don't have a before photo of it, but it had a print of a Tuscan farm scene on it. I was going to paint over it, so I was just looking for a good size canvas to work with. You could buy a blank canvas at JoAnn's or use a piece of wood also.
Step 2
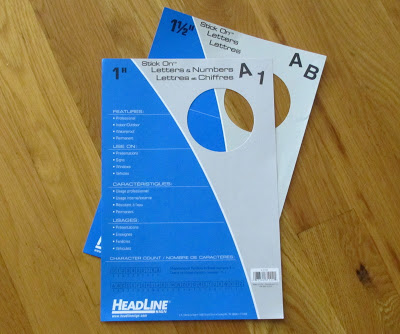
I figured out what I wanted my sign to say and then I ordered sets of these adhesive letters online in the Helvetica font at MisterArt.com.
I used the 1 ½" letters for any word that would be 8 letters and under and the 1" letters for words that are longer than 8 letters. Basically I figured that if the letters were 1 ½" tall then most of them would be 1 ½" wide, so the most letters that would fit across 12 inches would be 8 (12 divided by 8 is 1.5). In the original signs, they mixed font sizes - that is why I didn't use all 1" letters.
I counted how many of each letter I would need and ordered enough letters to use.*
You can buy similar letters at Hobby Lobby and some office supply stores also, but for some reason I couldn't find the 1 ½" size letters other than online.
Step 3
I sprayed the canvas with primer and then two coats of Krylon Gloss Ivory spray paint. I picked the ivory so that the letters would look antiqued.
Step 4
I figured out how to space my letters to fit on the sign correctly and drew lines in pencil across the canvas with a t-square so I would have an even line to line my letters up to.
Step 5
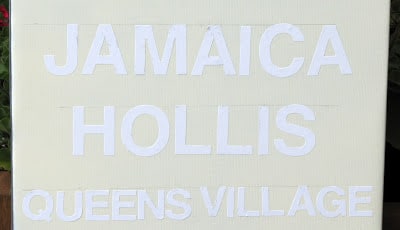
I applied the letters to the white canvas and then spray painted over them and the rest of the canvas with Rust-Oleum's Ultra Coverage Semi-Gloss Black spray paint.
Step 6
I peeled off the letters (that are now covered in black paint), revealing the white lettering underneath. To avoid paint peeling issues I didn't want them to dry 100%, so I let them dry about 15 minutes and then used an exacto knife to get under the edges to pull them up.
Step 7
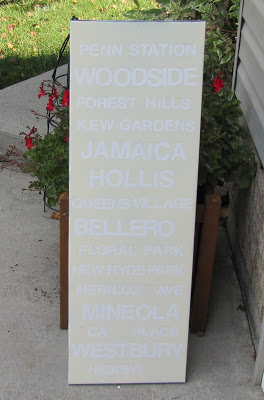
When it had dried for 24 hours I coated it with a two light coats of a sealer.
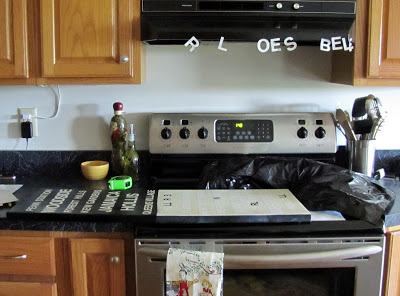
* - OK, I miscounted somewhere and ran out of letters, so I had to paint the sign in two stages. Painted the top and then took off the letters that I needed to complete the bottom and spray painted the bottom. BTW, the stove makes an excellent letter holding area.
So go wild. You can use a thin canvas like I did or use a more square one. You can use real subway stops or you can use Paris or London subway stops. Or you can use just a set of words that have meaning to you. I used Long Island Railroad stops on my sign that I found on the New York MTA site, but that is just me being anal retentive for historical accuracy.
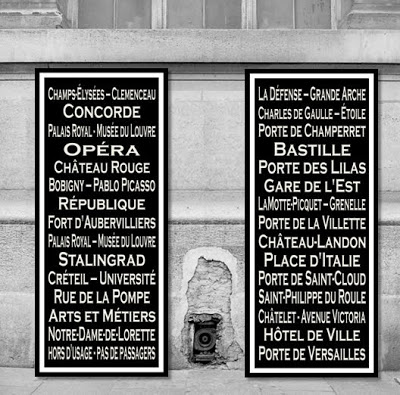 (Photo courtesy of SubwayArt.com)
These signs have sort of exploded on the Craft blogs. I saw my first subway sign at Under The Table and Dreaming's blog a few months ago. And Jen at Tatertots and Jello had a linkie party for subway art recently. There are a lot of people that have used the subway art concept and have made it their own.
I think that if I had a Cricut or a Silhouette machine I probably would have cut the sticky letters out that way. Some people have used stencils to paint the letters onto the black background. A lot of people have printed the letters out onto copy paper using Word, cut them out by hand and then decoupaged them to the sign - you have to make the background black (format/background/black) and the font white (format/font/font color/white).
My niece did this sign recently using the copy paper method. I've heard her hands got tired from using scissors, but the sign came out beautifully.
A.S.A.P. ~ As Southern As Possible
Just came across this tutorial and I can't thank you enough for how easy you've made it!! I love the ones sold in Restoration Hardware, etc. but will not fork over that kind of cash! Love that you even used a pre-printed canvas. Will definitely be trying this one 🙂
Hope you're enjoying your summer
artteachergirl
How did I miss your tutorial on the signs!!!??? They are great! This is a project I want to do!
Polly
Thank you for posting this tutorial! Maybe I can find the time to make one of these. I really really love it!
Bounty Huntress
I love this! Thanks for sharing!
Sandy
Your Subway sign is really nice.. I just don't know how you got the lines in perfect order..
I might try this.. thanks for the link to order the letters...thanks for your visit also and your kind words..
Sandy
Country Dreaming
Very cute.
You did a super job.
Melinda
Ott, A.
Those look sooooo great. And it looks kind of simple, even for a crafter with 2 left hands like me. 🙂
NanaDiana
Pam! What a great tutorial! It sounds like a bit of work but OH! the results! My daughter was looking at a sign similar to that today at Target. I told her to wait that one of "my blog gals" was posting a tutorial. She said..yeah..right~ I can't wait to show her this project! It will be right up her alley (right next to her bowling ball)...lol Diana
Olive Cooper
It is in the remote realms of the possible I could do this in the distant future. If I could stay out of thrift stores perhaps. You make it sound kind of easy but you are a math person and I am not. I also have 200lbs of lime to put on my schrubs...see I am making excuses. Thanks for this. bighugs♥olive