

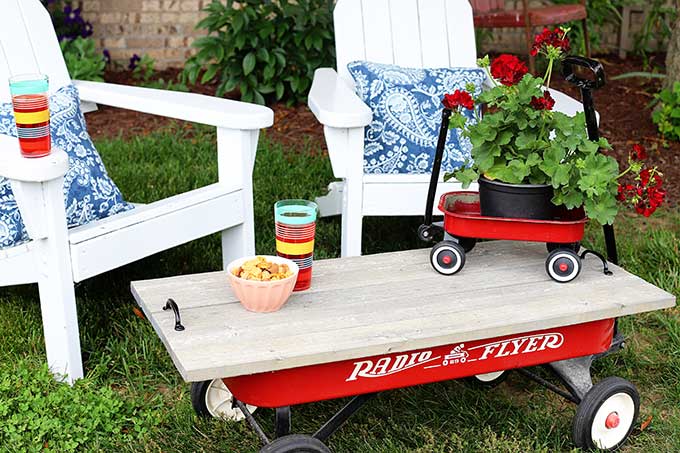
I have been meaning to do this project for YEARS and then when I ran across an old red wagon while out yard sale hopping the other day I knew it was time!
Today I'm going to show you how to repurpose a little red wagon into a fun and funky outdoor coffee table for your patio.
On a side note, did anyone ever ride IN the wagon going down a hill like the kid on their logo is doing? Not having someone pull you around, but actually using the handle to steer and all that?

Seems dangerous (said the girl who used to jump off the neighbor's porch roof just to see if you could do it without breaking your neck).
Spoiler - I'm still alive.
BTW, you can also see how I used my wagon at Christmastime this year HERE - Little Red Wagon Christmas Porch!

(This post contains some affiliate links for your convenience. You can read my full disclosure policy here.)
How To Make A Little Red Wagon Patio Table (with hidden storage)
Supplies:
- Radio Flyer Little Red Wagon (standard 34" x 15 ½" size)
- 2 Door or Gate Pulls
- 3 - 1 x 4 x 8 pieces of wood, cut into 5 pieces at 40" long and 2 pieces cut at 13 ½" long
- Wood Stain for cut ends
- Brad Nailer or screws and screwdriver
- Appropriate safety equipment (eye protection, etc)
Cuts To Make:
Have Home Depot cut the wood for you. Easy, quick and saves you from having to pull out the saw when you get home.
Be aware that they state they can not cut for exact measurements (I think they say they will get it to within ¼" or so), but I've never had one of the workers so far be all willy-nilly when cutting it.

You will want a total of 5 pieces cut at 40" long for the table top and 2 pieces cut at 13 ½" long for the cross boards.
Each 8 foot board can be cut into 2 of the 40" lengths and 1 of the 13 ½ inch lengths with a tad left over. So when you cut all 3 you will end up with a little extra wood left over. Just keep it to make a sign or something small with later on.
I fell in love with this barn wood that Home Depot sells. This is not actual wood from an actual barn, this is new wood made to look weathered. Lowe's and Menard's might have something similar, but the closest store to me is Home Depot, so that's where I hang out.
It comes in a grey finish or a brown finish. I used grey.

Instructions:
The barn wood has a good side and a different side (I don't want to say it's a "bad" side, but it's just not as lovely as the front side).
Flip your 5 pieces of 40" long boards good side down.
Place your 2 pieces of 13 ½" long cross boards on top of the other boards and either use a brad nailer to nail them together ( 1 ½" brads will work great without popping through the top side) or use 1 ½" screws to screw attach the boards.

I used the brad nailer and used 2 brads per board for each cross board, so a total of 20 brads (5 boards x 2 cross boards x 2 brads per = 20).

Your top should look like this when done nailing or screwing.

The reason for the cross boards, besides holding the longer table top pieces together, is to keep the table top from shifting around. When flipped over, it should fit snuggly in the wagon without wiggling around too much.
You don't want someone putting their feet up on it and the whole top, nachos and all, comes sliding off your wagon.
Just in case you are working with an odd sized Radio Flyer or different brand of wagon, this is how you can figure out where to place your cross boards. Cut them for length and then slide them as far against the ends of the wagon as you can, so there is very little left to right movement. The wagon is rounded at the end, so there will be a stopping point where you cant slide them further. Measure the distance between the outer edges of the boards and make sure you use the same distance when making your table top.

After nailing or screwing, you want to flip your top over so the good side is showing and attach your pulls with either a screwdriver or drill.

I found the door pulls in among the gate hardware.

You could use cabinet pulls, but they generally have the screws coming up from underneath/behind so you would have to drill holes up from the bottom into the pulls, rather than the gate pulls I bought which simply get screwed straight down into the wood.
And we're going for simple here.
Any cut ends of your boards will be a different color (remember it's new wood made to look old, not actual barn wood), so you will want to stain the ends of the boards to match. I used Varathane's Weathered Gray Wood Stain.

Although long after I had left my local Home Depot, I noticed that the tag on the ends of the boards suggested using Behr Grey Touch-Up Wood Stain. It's up to you or if you want to be all daring, you could skip this step and let them weather naturally.

Now you are ready to take your table out for a spin around the yard!
BTW, I found that baby red wagon at Goodwill, but they sell them on Amazon - mini Little Red Wagon.
I almost forgot! The best thing about this table top is it's built in storage!
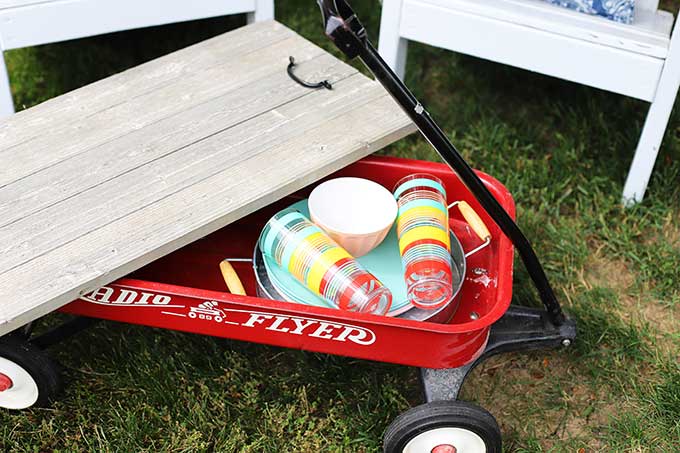
You can put serving pieces or even gardening tools. It's your hiding place, so do with it what you want!
FAQs:
Let's get a couple Frequently Asked Questions out of the way before they are even asked. How is that for service!
What if my wagon looks different than yours? I used a basic Radio Flyer little red wagon. If you are using a different brand or a different style of wagon, you may have to adjust the measurements of your wood. The wood measurements I have given are for the standard 34" long and 15 ½" wide metal wagon. See above where I talk about measuring for the cross boards.
I don't want my table to look like it fell off a barn somewhere in Amish country. Do I have to use barn wood? Nope, you do not have to use the cool barn wood that Home Depot sells, you can use pine or other woods depending on the look you are after. Keep in mind this in not actual reclaimed wood that came from a barn, it is new wood milled and stained to resemble the look of old wood. I have worked with actual reclaimed barn wood in the past and it is a little wonky and not always straight and maybe even a little buggy and moldy. So the faux barn wood is a nice alternative when you want something nice and straight and not 100% authentic.
Wow, that looks splintery. Do I need to buy a set of tweezers? Yes, this barn wood is a little more rough and tumble than smooth pine would be, but I like the rustic look. And no, even though it looks rough, it's not dry and splintery.
Can I use pallet wood? Hmm . . . I knew someone was going to ask that one. I would not just because you may have food on the little table and who knows what has been transported on your pallet before you found it (a car engine? a load of manure? a side of beef?). Pallet wood would be an extremely inexpensive way to make this table and some people are more fond of pallet wood than others, so that is totally up to you.
Donna from Funky Junk Interiors has a nice post on All You Ever Wanted To Know About Pallet Wood if you want to go that route.
![]()

OK enough hypothetical questions, today is Thrift Store Decor Team Wednesday!!! Lots of fun and funky thrift store upcycles going on around here.
Pop on over and see what my friends have done with their recent thrifting finds!

Refresh Restyle - DIY Antique Crock
Petticoat Junktion - Repurposed Chandelier
My Repurposed Life - Painted Wicker Basket
My Uncommon Slice Of Suburbia - Night Stand Makover
Sadie Seasongoods - Making Decorative Garden Stones From Copper Molds
Domestically Speaking - DIY Rustic Bathroom Mirror
Our Southern Home - DIY Decorative Painted Box
House Of Hawthornes - Repurposed Little Red Wagon (that's me)

Other posts you may enjoy:
DIY Wood Slice Owl
100 Best Thrift Store Makeovers
DIY No-Sew Shirt Pillow Tutorial (great for porch pillows)
Pamela
We have a red wagon in our basement It’s 46 years old!! It was our sons when he was very little.
Donna
Very cool!! Like it a lot!
Christy @ Our Southern Home
What an adorable makeover! I've seen that wood in HD. Now after seeing this, I need a project for it. I just LOVE this project!
Linda @ Itsy Bits And Pieces
This is such a fun project, Pam! I spent many fun hours with my wagon as a girl. Yes, I did go down (small) hills with it...and jumped off roofs, too. We would have been partners in crime. And I totally agree with Cheryl's comment.
Debbie
Oh my goodness, now I have to find a wagon! Love it Pam.
Jenny
I have a rusty vintage olive-green wagon, which now might get a new lifestyle as furniture, thanks to you!
Sarah Ramberg
That is ADORABLE!! I never would have thought of this but I love, love, LOVE it!
Mimi
My mouth literally dropped open, this is really unique, I love it!
Maryann
Oh that is the cutest!!! What a fun idea for a table!
RJ
Love this idea! I’ll be on the hunt for a cute little wagon now. 👀 Thank you for the inspiration!
gail
Pam,
would you believe I've had one of these in my stash for years! I never knew what to do with it. hahahah
I love all of your great tips.
pinned!
gail
Cheryl
Of all the Blogs that drop in my “inbox”, yours is the one I most enjoy.
You are so creative, and funny, and relatable. I love your projects, your style, your humor, and your overall outlook on life and living. ❤️
Pam Kessler
Aww, you made my day! Maybe even my month. Thank you!